“Why would one do a pastel study?” you might ask. I believe it is for the same reason a pianist practices their scales, or a figure skater practices their figure eights and jumps.
Only until those small components of your art become second nature and you have solved the small problems, are you able to put the pieces together into a “long” program where your emotion and passion creates something complete and whole.
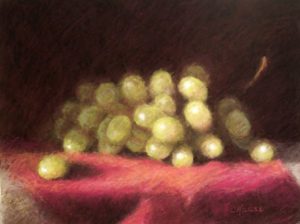
In “Green Grapes Study” I wanted to work out the issue of painting a “clump” of objects. My concept was that not every component needs to be defined to give the illusion of grapes.
I approach a study the same way I approach a larger painting in terms of process:
1. Setup: As a still life artist I work from real life so the first thing I do is put my subject on my still life ‘stage in the studio and light it. I work in a dark studio with a can-light on my still life and one over my easel. I am currently studying chiaroscuro (light/shadow) with pastel artist, Deborah Bays, so most of my still life setups/paintings use light to reveal the forms.
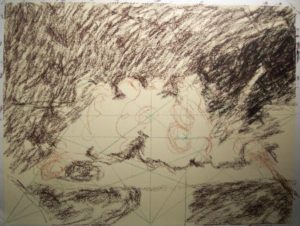
2. Composition and Design: (Photo 1) As part of the class we have been exploring Dynamic Symmetry (DS). DS is the partitioning of space using classical armatures such as the Golden Mean and the Whirling Square. Yes, I even used it for a ‘clump’ of grapes. The particular grid I am working with is drawn right on my paper with a pastel pencil. The focal point of the grapes is placed on the right mean line.
3. Working on the Dark Structures: (Photo 1) In the Light/Shadow style of painting laying in your dark structure first is important. I usually use Wallis paper with NuPastel s (hard). This was a different sanded paper, which didn’t respond to my stroke and application like Wallis, but I did eventually figure out how to get it to work. I ended up using a medium pastel (Rembrandt) to lay some color down, then “smush” a little with my fingers. The paper then began to take my strokes as usual. This was also a useful bit of information learned from the study.
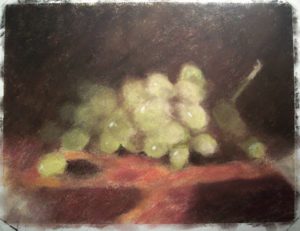
4. Working on the Layers of Color: (Photo 2) I begin to lay in the color mostly in the midtones and light areas.
5. Finished Study: (Photo 3) “Green Grapes Study” 9 x 12 pastel on ArtSpectrum’s Color Fix (Pale Yellow). I finished this piece adjusting values and adding a few specific edges, especially in the left shadow area.
6. The Finish: What I learned for ‘clumps’ of objects is not to draw each individual component, but to paint the large shapes (massing in) and then begin to refine. This is where I have gotten hung-up on painting flowers. I was trying to draw each petal, and they looked so contrived, like little soldiers. Knowing when to stop refining is crucial. A few well placed hard edges, leaving most of the edges soft especially in the shadow areas, will leave room for the viewer to ‘fill in the blanks’ which makes for a much more interesting painting.
The next ‘clump’ study I do will be an artichoke. They had some great looking ones at the produce section at them grocery store. Where could your art benefit from doing small study.
———————————————————————————————-
Guest artist/author: I found Cindy Haase on Twitter and was charmed by her small pastel paintings. Cindy is a fine artist who specializes in dry media. She prefers intimate still life settings. Cindy is member of the Colored Pencil Society of America and exhibits in their annual juried exhibition as well as the International Guild of Realism and Lakewood Arts Council in Colorado. For more information on Cindy, please check out – http://cynhaase.blogspot.com/
Best – Lori 🙂


Great post this will really help me.
great.it helps alot.thx