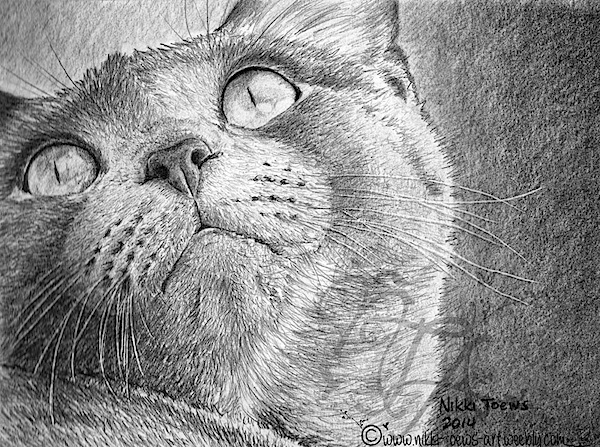
As an artist, I am always learning with each new piece I create. Recently I learned of a new technique for drawing light lines (in this case, for whiskers) against a dark background that I would love to share.
A common challenge I face in pencil drawing as opposed to acrylic painting is getting crisp, white lines (such as hair or whiskers) over a dark background. While in painting this can be achieved by using light paint on top of the background, with pencil you cannot draw white on top of black; the only white available is the paper showing through.
In the past, I have drawn white whiskers by lightly sketching the outline of the whiskers, then shading in the negative spaces. Although this is a helpful technique that has its place, I find it can be quite time consuming and tedious. I’ve also tried using a sharpened eraser to create white whiskers, but I cannot get them fine enough or bright enough.
In the tiger drawing below, you can see an example of using negative space line drawing.

However, I find the “new” indentation method a lot quicker and easier, and it makes wonderful, fine, sharp lines.
Here’s how it works:
- It involves simply indenting the paper deep enough so that your pencil skips over the “valley” as you shade, leaving you with a crisp, white line.
- This can be achieved with any pointy, but rounded object, such as an EMPTY ball point pen, a stylus, knitting needles, or even your thumbnail.
- Experiment with different tools to see what you like best. The goal is to be able to indent the paper but not shred or tear it.
- When shading over the little “valley”, be careful not to use a very sharp pencil, as it might fall into the indentation rather than skip over it. Also, do not shade in the same direction as the indented line, as again you could shade into the indentation.
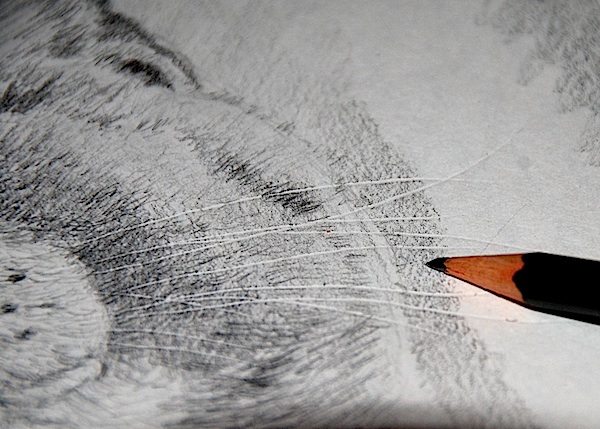
A word of caution in using this method: it CANNOT be erased once you make the mark!
- So be sure to practice, practice, practice.
- It might help to lightly sketch with a pencil as a guide, then indent BESIDE the pencil marks (not on top or else you will press the pencil mark into the paper, making it difficult to erase).
- With the indentation method, it is also very important to press firmly, but also quickly and smoothly.
- The last thing you want to end up with is a shaky permanent line.
Although I find this method most helpful for drawing whiskers, play around with it making a variety of different marks, from lines to dots. Also experiment with different papers. Have fun!
So there you have it, drawing lines using the indentation method! I hope it’s as helpful in your pencil drawing as it has been for me.
Guest artist/author: Canadian artist, Nikki Toews is passionate about animals and nature and loves to create art centered around these themes. She also specializes in custom portraits and commissions. You can find her on Facebook or her website.
***Thanks to Nikki for sharing a valuable art tip! And thank YOU for visiting FineArtTips.com. You can meet me on my social media sites > Fine Art Tips Facebook Fan Page, on Twitter, Google Plus and on Pinterest. Be sure and check out and my fine art prints and notecards on Fine Art America. Or see my art on my website, LoriMcNee.com. ~Lori






Thanks a lot for this wonderful tip..It was really helpful..love all the fine art tips at this blog..
This little known tip is a useful addition to any artist’s drawing repertoire. I’m happy you found it helpful and are enjoying my other blog posts. Thanks for the comment and visit.
Lori 🙂
WHAT A CLEVER METHOD! Thank you, Nikki and Lori, for sharing this extremely helpful trick!!!!
Hi Lucy! Yes, isn’t it a good one? I have drawn for years, and never utilized this technique like I should have. I primarily use the negative space method because those indents are permanent! We just need to be mindful of our indenting. 😉
Hi Lori,
I just discovered your blog this morning! This is such a great tip, and I’m going to use it in the cat portrait I’m currently working on. I’ve tried various methods for whiskers, but having tried this out this morning on a rough piece of paper this is by far the best!
Thank you for sharing, I’m look forward to more!
Nicky x
Happy to hear this tip is going to be of help to you! Thank you for letting me know. 🙂
Hi Lori,
Thank you for sharing this excellent way of creating white lines. I have used the technique a few times and have found it really helpful. I have written about the experience on my blog: http://csillustrator.com/blog/2016/7/1/white-whiskers.
Thanks, Catherine
Thanks for your comment. My apologies for the belated reply