 Do you often take reference photography of a scene for later use in the studio?
Does it sometimes lack the detail you would like to have either because the shadows are too dark, or the sky is a blaze of white?
Recently, Lori referred us to a helpful article by Texas artist Rusty Jones entitled, “How to Use Good Reference Photos for Landscape Painting”. Rusty explains the importance of using photography in addition to using site sketches, and notes created en plein air. He points out how important his field notes and sketches can be if the reference photograph does not clearly show the details of the scene. I couldn’t agree more.
However, as a photographer shooting digitally, I have a helpful idea I want to share…
Sketches and notes cannot be replaced by a landscape photograph. Too many of our senses are involved that help us to interpret what we see in order to get that impression on canvas or paper. Plus, creative license says we can paint our scene any way we want it!
However, there are a few things we can do to insure that we have the best reference information possible back in the studio. The first tip suggests that you purchase and use an easy to learn software program. But, the second tip might not cost you a thing!
Before you jump ahead to the free version of my tip I hope you will read through this first part. It will give you the best single reference photo of your total scene possible. It might be free, depending on your camera, or any software you might already own, or maybe even what cell phone you have.
So what’s tip #1? Create an HDR image.
What is an HDR image? HDR stands for High Dynamic Range.
Basically, the photographer takes 3 images of a scene:
- One which properly exposes the bright parts like the sky.
- One that properly exposes the shadows.
- One that properly exposes the mid-tones.
Most digital SLR cameras allow you to turn on a feature called auto bracketing to take these images automatically. However, none of these photographs by themselves will look very good. But, loading the three into a program called Photomatix combines the best parts of the three exposures, and produces a final image that shows great detail in all areas.
This is the method I’ve used almost exclusively on all of my landscape photography for the last 3-4 years. It provides the painter much more detail.
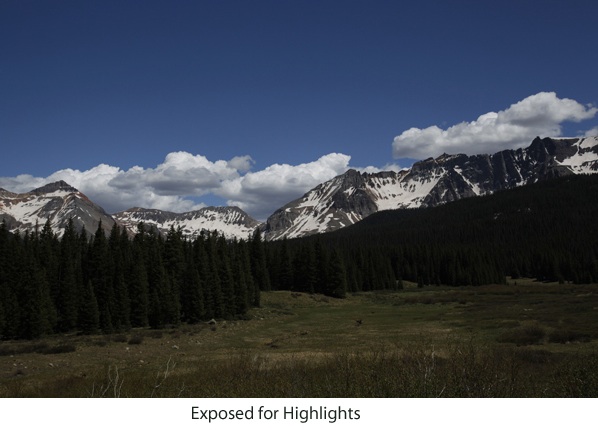
Below are examples of three bracketed images I took to produce an HDR image. Notice that one is overexposed for the sky, but shows detail in the shadows.
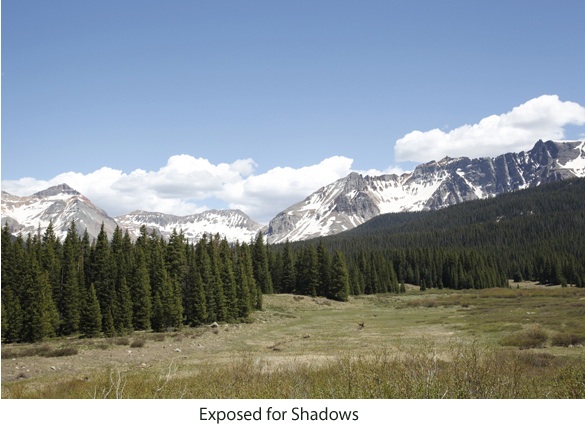
In another image the midtones are properly exposed but neither the sky or the shadows have much detail.
![Different Exposures[3]](https://lorimcnee.com/wp-content/uploads/2012/10/Different-Exposures31.jpg)
And then in yet another photo the sky looks great but the shadows are dark.
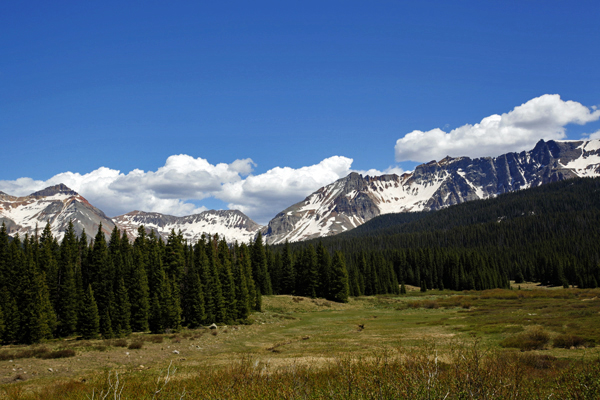
I simply load these into Photomatix and let it produce one final image! It should be noted there are all kinds of adjustments you can make within the Photomatix program if you’re not quite satisfied with how it looks. But, for the purposes of reference photography, I think you will be fine with it. The final image below shows the HDR image produced by Photomatix.

The Photomatix software is only available as a download from the website www.hdrsoft.com, so you won’t find it in stores. The cost is $99 which is a lot less than Photoshop which can also produce an HDR image. Photoshop is a great program, but I hear most photographers prefer the Photomatix version for their photography work. By the way, on my website I offer a discount code that will save you 15% off that $99 price tag. (*I’m not selling the software, I just think it can help painters have the best reference material.)
So, what do you do if you don’t already have Photoshop, and don’t want to shell out the $84 or so for Photomatix? Well, some of the newest SLR digital cameras on the market can produce an HDR image internally so check your owner’s manual. Recently, I learned that the iPhone 4 with iOS 4.1 can capture HDR images!
The Free Tip:
- As long as you can manually set the exposure on your camera, you can still take all the bracketed photos for the light and dark areas. Simply save those separately to use as reference should you need them. After all you aren’t trying to produce a perfect photograph you simply want to use all the reference material possible to help you produce what you want. And, in the digital age film is cheap so why not shoot the couple of extra shots.
But, if you don’t want to bother with any of these tips, there’s always artistic license!
Guest author: Terry Jackson photographs scenics, both nature and travel images. He is also an aspiring artist.
*****
Thanks Terry for a very informative post that will be helpful to artists who work with photography!
Let’s also meet on Twitter, and on Google Plus, Pinterest, and join in the fun at Fine Art Tips Facebook Fan Page! Please checkout my art too LoriMcNee.com, or find me on Instagram lorimcneeartist. ~Lori


YES!!! This is what I was experiencing this morning- our mountain was all covered with fog, which rolls in some mornings, and it had filled up the valley all night — and I so wanted to do some plein air painting, but I’m just not fast enough in acrylics yet.
One day I hope to have a dozen people to come and paint with me on this mountain, it’s so nice to wake up to a mountain view — and SO hard to photograph it — but apparently not anymore! I hope the photos I got this morning will be sufficient for this program.
Hello Katana, let me know how this program works for you! I’d love to hear a follow up from you. I haven’t tried it myself. Thanks for stopping by and commenting, and thanks again for all your support!
Lori
thanks for these tips I want to get more depth in my photos to give me more clarity so when I use them for watercolors, I have a better understanding of what was there…..thanks Bruce
Glad to be of some help. Good luck with your photo taking!
Lori 🙂