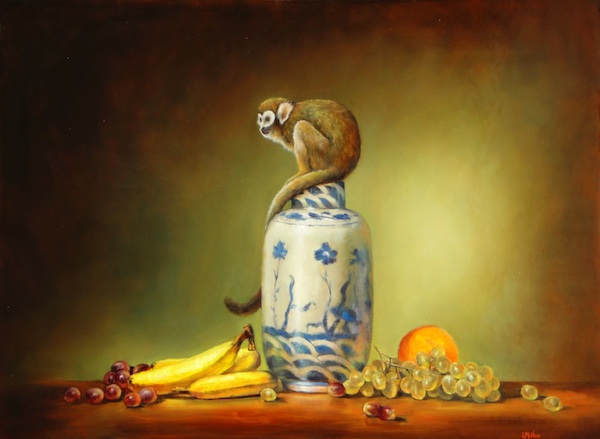
Believe it or not, I started my professional art career as a wildlife artist!
…and I learned from the best. Robert Bateman, John Seerey-Lester, Guy Coheleach, Alan Hunt and Carl Brenders taught me how to paint eyes, feathers and animal fur really well, while the late Vivi Crandall shared her amazing brushwork and color theory secrets with me.
In the speed video below, I demonstrate how to paint a realistic monkey. Painting animal fur is easy once you learn these simple techniques which can be applied toward any animal.
Here are a few extra tips to help you paint animal fur:
- I prefer to paint the animal over the existing background color. This helps to make the animal part of its environment.
- Outline the animal shape.
- First, I like to paint the eye…for me, when the eye looks correct, the animal starts to come alive!
- Next I do a thin wash of darker undertones over the body, allowing some of the background to come through.
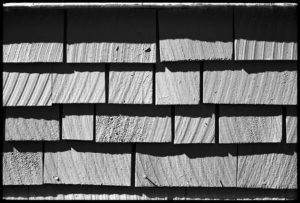
- Now it is time to begin ‘the fur’…remember this MOST Important Tip – painting fur is a lot like laying shingles or shakes on a roof – you start laying them from the bottom up! See how the bottom shakes are covered by the top and so on…this is the same way we place our paint-brush strokes to recreate fur on a monkey or any mammals, and even feathers on birds.
-
I started with the monkey tail and worked my way up the body.
-
It is important to understand the way hair, fur and feathers grow to believably paint them!
-
Then, start at the feet and work your way up the leg and around the hip and elbow.
-
For the face, start with the nose and the strokes radiate out from there.
-
It helps to splay the brush or use an old paint-brush to paint fur.
-
Remember to work from dark to light and thin to fat. The lightest color is last.
I hope this helps! Please, if you have any questions, ask in the comment section. Thanks, ~Lori 🙂
Thanks for the visit, ~Lori
Please check out my other helpful videos: https://www.finearttips.com/videos/


Hi lori
Can I ask you how do you make theses nice background ?. it looks very soft and shining?
Do you varnish the background befor you start painting ?
Hi Hamad – I guess I should make a video about my background technique someday because I get a lot of requests…Anyway, the background is made with lots of transparent glazes. I use burnt sienna, burnt umber, ultra marine blue and some cadmium red in the shadows and move to cad yellow, Naples yellow, and some cobalt blue in the light areas. I start with the darks and then add the light areas and blend it together for the desired affect. The medium I use helps create this technique.
I hope that helps a bit! ~Lori
Es una pena. Trabajas mucho en tu blog y lo aprecio mucho. Aprendo algo cada vez que llego a este sitio.
Quiero aprender lo que quieres enseñar en este video en el que pintas un mono. Pero , tristeza, la mayor parte del tiempo veo el dorso de tu mano, muy bella, dando saltitos, moviéndose. Muy bien.
¡¡¡¡¡ PERO NO VEO COMO APLICAS LA PINTURA !!!!!!!.
Ocurre en casi todos los videos que se puden ver por ahí. El pintor quiere enseñar , pero se pone de pie frente a la pintura y , todo el tiempo , nos enseña su bonita espalda, o su nuca y lo que nosotros quisieramos ver es lo que hace, su trabajo, su pintura.
La pintura sale desde la punta del pincel. ¿ Lo cargas mucho ? Es un pincel pequeño o grande ? Un pincel en punta o “lengua de gato” ? dejas mucha pintura cada vez que lo apoyas sobre el lienzo ? O dejas pintura y luego la vas dejando , aqui y allá, con toques suaves ?.
Qué pena !!!!!
¿Intentarás dejarnos ver lo que hagas la próxima vez ?
Tambien podría ser el tema de un post : ¡Cómo grabar un video sin ocultar lo qu eestás pintando !
Gracias por el tiempo que dedicas a este blog. Aprendemos de tí.
Saludos desde Mallorca.
Gracias Andres. Estos son gran sugerencias. Debo aprender a poner la videocámara en un mejor ángulo calcula luego hago un video como eso. Haré cuanto podré. Estos videos son difíciles de establecer y circular la cámara al pintar. Los hago yo mismo con un trípode. Pero, hago mejoro próximo tiempo. Estoy contento que quiere mi blog. gracias por el comentario. Lori 🙂
Wow that is so cool you got to learn from Carl Brenders and Robert Bateman! They are my two favorite artists! Thanks for the video on fur. How would you do eyes and make them realistic?
Yes, they are both so amazing. It was a wonderful time working with them. I will have to make an ‘eye’ video soon!
Thanks,
Lori
Beautiful! It looks so real! And I love the back ground! I am a 14 year old artist I sell lots of my art on etsy and I was wondering, I have just started painting and should I do the back ground before I do the foreground? Any way thanks for the awesome video!!!
Hello Lauryn, I am happy to hear you are a young artist! I might suggest blocking in the subject first and working the background around it. Try and bring all the element together at the same time. If you paint the background first, and paint the animal next, your animal will look like a cardboard cut-out glued to the background. The animal/subject and background need to feel like a believable atmosphere. I hope this helps!
Lori 🙂
So where do I learn to paint hair like Brenders? 🙂
My comments for what they are worth Lori:
Don’t hide your brush strokes with your hand when making video. 🙂
I think you have shown how to paint the basic underlay of fur …now what you need, or I need, is instruction on the fine details of the fur and whiskers a la Brenders.
I keep looking. 🙂
Bri
Hi Bri, it was not my intention to hide my brushstrokes. I just set up my camera an painted…next time I will keep that in mind. I hope you got a few clues from watching me. I worked with Brenders, he is a masterful painter.