This blog post will take you through the detailed steps of patching a torn canvas, accompanied by an archival step-by-step guide and 3 helpful how-to Instagram Reels.
But first the backstory…
A few months ago, I was in a terrible wreck that totaled my brand-new truck while I was on my way to deliver paintings to my gallery in Montana. Among the damaged artwork was my cherished owl painting, “Mystic Guardian.”
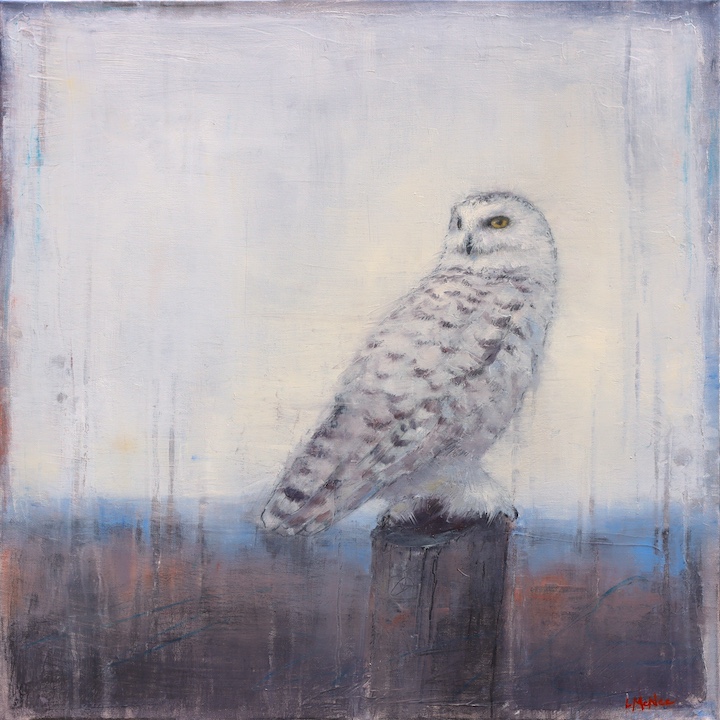
Determined to restore it, I repaired the painting and created three how-to reels to document the process. I’m thrilled to share that “Mystic Guardian” is now beautifully restored and was recently SOLD during my recent exhibition at Kneeland Gallery.
Below are the steps and my Instagram Reels to guide you through the process!
Part One: Fixing the Tear
Materials Needed
- Thin Japanese paper (e.g., Kozo or Rice paper)
- Conservation-grade adhesive (methyl cellulose, Beva 371, or acrylic gloss medium)
- Soft bristle brush
- Palette knife or squeegee
- Weights or clamps
- Clean, flat work surface
- Wax paper
- Tweezers (optional)
View this post on Instagram
Step-by-Step Process
1. Prepare the Canvas First, carefully remove the canvas from the stretcher bars. Use a knife for the initial cuts and refine with scissors to prepare the painting for its next steps. 🖌️✂️
- Carefully remove the canvas from the stretcher bars.
- Use sharp scissors for precision and wear gloves to protect the canvas.
- Cut excess canvas, as it will shrink when glue is added to the back.
View this post on Instagram
Part Three: Mounting the Canvas onto a Panel
Before mounting the canvas onto a panel, here are some key points to keep in mind:
- Glue Shrinks Canvas: When applying adhesive to the back of the canvas, it shrinks. Give yourself a wide margin for re-stretching the canvas onto a new panel. For instance, I had to cut Mystic Guardian down from 24×24 inches to 20×20 inches! I should have given myself an extra two inches instead of only one inch.
- Patch The Torn Canvas Before Removing: Sometimes, the patch alone is enough without removing the canvas from the stretcher bars.
Materials Needed
- Gloss gel medium (e.g., Golden Gel Medium)
- Soft bristle brush or foam roller
- Palette knife or squeegee
- Weights or clamps
- Clean, flat work surface
- Frame and framing tools
- Hanging hardware
- Protective gloves (optional)
Step-by-Step Process
1. Applying the Gel Medium Pour a small amount of gloss gel medium in the center of the panel. Spread the gel medium evenly across the entire surface of the panel using a soft bristle brush or foam roller. Move to the back of the canvas and repeat the process, ensuring full coverage. Work quickly!
2. Mounting the Canvas Carefully lift the canvas and align it over the prepared panel. Start at one edge and gently lay the canvas down onto the panel, smoothing it out to avoid trapping air bubbles. Use a palette knife or squeegee to smooth the canvas from the center outwards. Pay special attention to the edges.
3. Securing and Drying Place weights or clamps around the edges and across the surface to ensure even pressure while the gel medium dries. Leave the painting to dry completely, following the drying time recommended by the gel medium manufacturer.
4. Inspect and Trim After the gel medium is completely dry, remove the weights or clamps. Trim any excess canvas from the edges of the panel using a sharp blade or scissors. Lightly sand the edges if needed to ensure a smooth finish. Check for any air bubbles or areas that might need additional smoothing.
View this post on Instagram
Part Four: Framing the Canvas
1. Choose a Frame Select a frame that complements your artwork and is suitable for gallery display.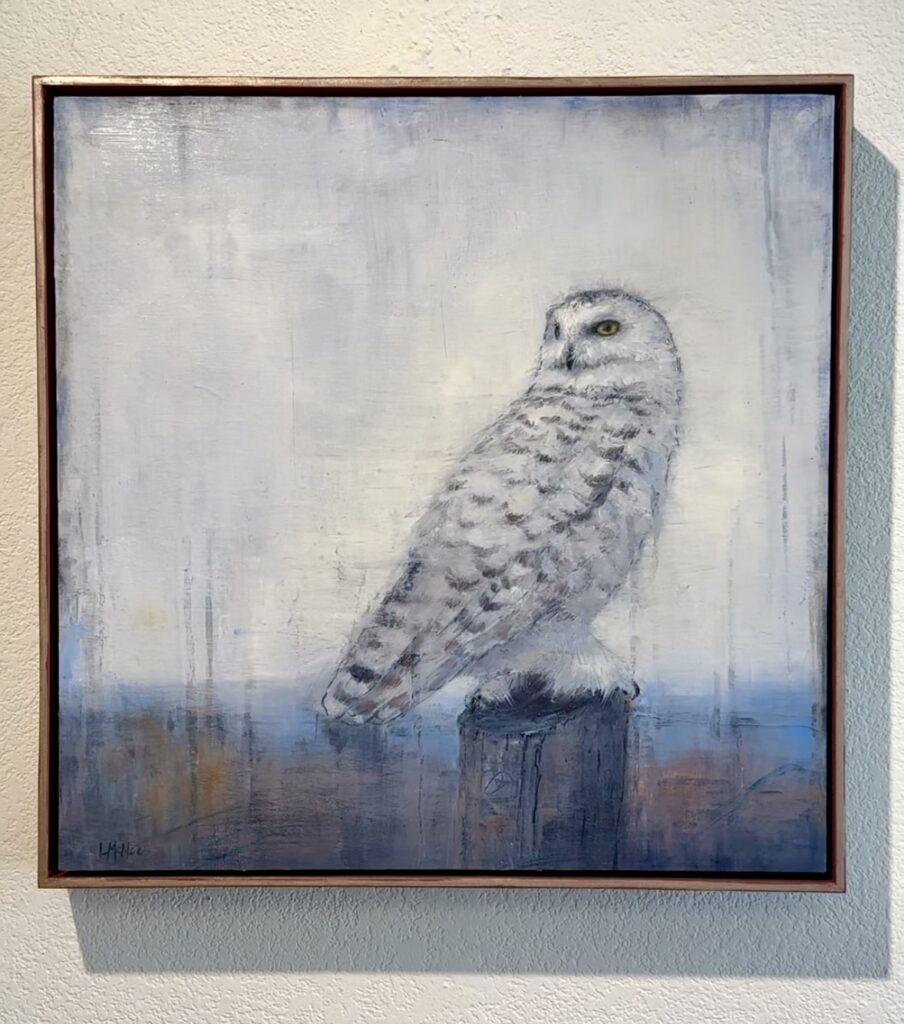
2. Mount the Canvas in the Frame Place the mounted canvas into the frame, ensuring it fits securely. Use framing tools to secure it in place.
3. Attach Hanging Hardware Attach hanging hardware to the back of the frame, ensuring it is sturdy and centered.
4. Gallery Display Hang the artwork on the gallery wall using appropriate wall hooks or screws. Use a level to make sure the artwork is hung straight. Step back and inspect the artwork to ensure it looks perfect with no visible signs of the previous damage.
Conclusion
This restoration journey taught me several valuable lessons about handling and repairing artwork. Thankfully, “Mystic Guardian” is now back to its former glory, ready to be enjoyed by its new collectors.
Archival Glue Choices
Methyl Cellulose
- Pros: Reversible, non-yellowing, suitable for delicate repairs.
- Cons: Requires mixing and preparation.
Beva 371
- Pros: Strong bond, widely used in conservation, flexible.
- Cons: More expensive, requires precise application.
Acrylic Gloss Medium
- Pros: Durable, flexible, easily accessible; my choice for this project because I know how to use it confidently.
By following these steps and using high-quality materials you can repair a torn canvas and preserve your artwork. Thank you for joining me on this restoration journey!
![]()
PS. Come plein air painting with me to The Cotswold in the English countryside, in May 2025!