Drawing is one of the central elements of visual arts, along playing a crucial role in a multitude of other creative and technical fields, and is one that improves with practice and helps develop other types of visual communication.
(Betty Edwards is a pioneer in this area, and inspired this post with her book, Drawing on the Right Side of the Brain. Check out her site.)
Artist and master draughtsman David Hockney has stated that:
Being able to draw means being able to put things in believable space. People who don’t draw well can’t do that.
Here are 6 simple creative exercises that can enhance your drawing skills.
1. The vase/faces exercise
This exercise plays on figure-ground perception – the way our vision recognizes objects, such as the face/vase image. In this classic example we can see either the profiles of two faces looking at each other or the curvy outline of a vase.
For this exercise begin by drawing one profile. If you are right-handed start with the profile on the left of the page; if you are left-handed start with the profile on the right. As you draw the face’s shape say out loud the names of the features: ‘Forehead… eyebrow…nose…lips…chin…neck..’
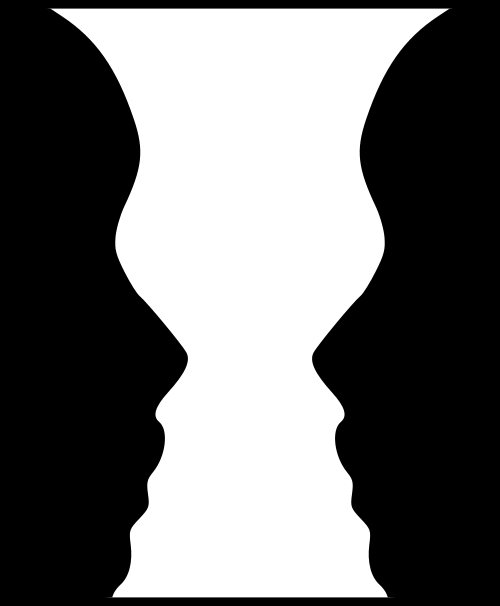
When you have completed the first face try to draw the opposing face which will complete the vase/face image.
It is probable that you will find yourself struggling to draw the outline and it is this conflict that is the valuable part of the exercise. The conflict is your brain struggling with the way things ‘should’ look and the way they really look – the exercise requires a shift from verbal descriptions to a non-verbal, purely visual perception of the world, and this is central to good drawing.
2. Gestural drawing
Gestural drawing is concerned less in the accurate appearance and details of things, but instead aims to capture the movement, dynamism, energy and essence of the visual world.
A great way to practice gestural drawing is to observe and sketch motion. This could be drawing people and animals moving, outdoor scenes such as busy streets with people walking, traffic and lights or movement in nature and weather such as the wind shaking trees and leaves, clouds passing through the sky, changes in light or waves crashing on a beach, or could even be moving images – sketching from television and films. Wherever you choose to capture motion, sketch quickly, repeatedly and over the top of previous images. You may find that your drawings become similar to animations or the work of Cubists Pablo Picasso and George Braques.
Secondly, gestural drawing can be employed to draw static objects and scenes. Try to draw with quick and dynamic movements, working with gestures and movements of the hand – and again, instead of focusing on details try to build up the picture with minimal marks, capturing the visual essence of your subject.
3. Automatic Drawing
Automatic drawing is a highly expressive form of image making first proposed, developed and promoted by the Surrealists – Andre Breton, one of the movements founders, described surrealism as ‘Pure psychic automatism’. Essentially, automatic drawing is the ‘thoughtless’ creation of random mark making and subsequent reflection on what has been drawn; in this sense automatic drawing can be a powerful tool for art therapists. People who are being treated and diagnosed using art therapy – this could be children coping with issues around abuse, imprisoned criminals, the elderly, people undergoing detox and withdrawal from drugs and alcohol, or people in numerous other difficult situations – may be asked to produce drawings without thinking about what they’re are creating. The results can be used as a form of diagnosis to reveal subconscious or suppressed emotions and thoughts. Automatic drawing has also been associated with ‘mediumistic automatism’, in which people claim to be drawing or writing on behalf of spirits and ghosts.
For your own practice, automatic drawing can be a great way of making your drawing more free and fluid. Simply take a piece a paper, try to free you mind of all thoughts and start randomly making marks with your drawing tool, whether it’s a pencil, charcoal, graphite stick, pen or brush. The results maybe quite rough, childlike and abstract, but should give you plenty of ideas to work on. Ideally, if you have the space and room in which you can make a bit of mess, pin large sheets of paper to the walls and attack the picture with a large brush dipped in ink, wielding your brush as you would a fencing sword. The experience can be truly cathartic and should leave you with some powerful pictures.
4. Upside-down drawing
For this exercise find a picture of a person’s face – try to find a striking image of someone with a interesting face. When you have chosen a picture turn it upside-down and start copying it in a drawing. The important thing is to try to forget that you are drawing a human face; instead concentrate on the shapes, lines, angles and patches of light and dark. Don’t think about the facial features, simply explore the details of the picture plain. When you have finished turn your drawing the right way up – you may be surprised at how accurate your copy is.
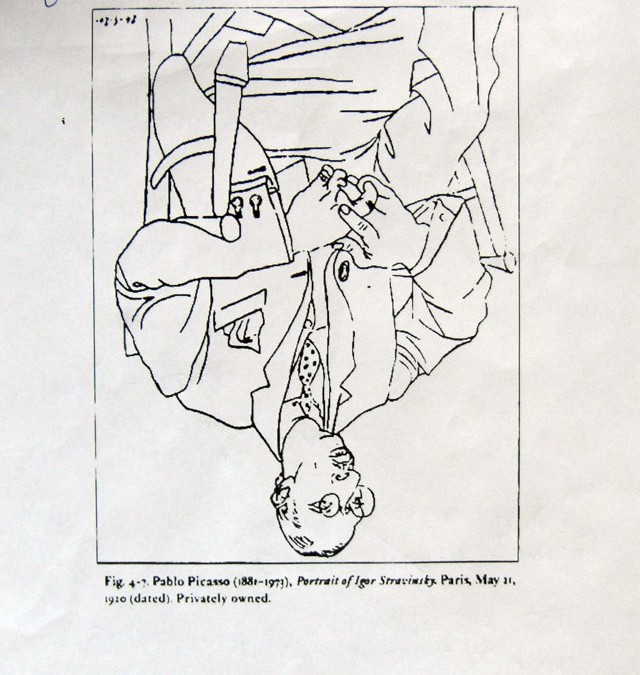
The principle of this exercise is based on the concepts that Betty Edwards presented in her classic book Drawing on the Right Side of the Brain. Human perception is tuned to look for recognizable features that make up a face, and when we attempt to draw a face – whether from memory, copying a photo or directly from life – we often draw what we subconsciously believe a face should look like. The mind has a set of symbols for eyes, noses, mouths etc., and in drawings we often replace how features really appear with a collection of symbols, resulting in a recognizable image of a face which nonetheless remains unrealistic. By learning to ‘forget’ what you are drawing and instead focus on the purely visual reality of the scene in front of you, you should be able to create more realistic and life-like drawings.
5. Drawing negative spaces
Negative space is the areas of the picture plain that are outside the main subject of the image, the shapes and spaces that define the subject and various elements within your drawing. As an exercise in negative space drawing choose an object or scene with interesting shapes within it. It could be something seemingly mundane such as a chair and table, or a complex scene such as the mosaic of leaves on a plant or tree. You could also ask someone to pose for you and use the shapes around their body for the drawing.
Whatever the subject you choose, decide on what appears to be the main area of negative space around the object and try to draw this; try to forget about the subject of the image and concentrate purely on the shapes and angles that make up the picture plain. Once you have described the main are of negative space – the basic unit – you can work outwards drawing all the negative spaces. Leave the chair, tree, person or whatever else you have chosen as your central subject as a blank space, only adding tone and detail in the negative spaces. You should produce some pleasing drawings as a result.
Drawing negative spaces works in a similar way to the vase/faces and upside-down drawing exercises, helping you learn how to forget about the recognizable objects and features in your pictures and instead focus on a truer representation of the visual world. Utilizing this technique is especially handy for people aspiring to be graphic designers as well as artists, as its implementation is a key component of good design techniques.
6. Non-dominant hand drawing
Finally, drawing with your non-dominant hand (left hand for right-handed people; right hand for left-handed people) is a great way to loosen up your drawing and can often produce some surprisingly pleasing results. The practice of drawing involves studying information visually, processing through the brain and controlling the hand to make marks. When we make pictures with the hand we are not normally used to drawing with the images are less controlled and often more fluid and intuitive than normal – another great exercise for developing and improving your drawing skills.
Guest author: Claire Mills
Thanks for visiting FineArtTips.com. You can meet me on my social media sites > Fine Art Tips Facebook Fan Page, on Twitter, Google Plus and on Pinterest. Be sure and check out and my fine art prints and notecards on Fine Art America. Or see my art on my website, LoriMcNee.com. ~Lori



These are great exercises, Claire! I can’t wait to give everything a try! A question though. When drawing motion, say for example, my always running around kids, about how long should I aim to finish a drawing? Thanks.
Hello Lucy, 5 minutes is plenty to get your eye-hand coordination working. A little bit is way better than nothing…
Thanks for the comment,
Lori
Thanks Lori,
When I do a blind contour drawing, it usually takes about 2 minutes. It’s really quick. I can do the same with drawing motion, too.
These exercises are all outtakes from Betty Edwards’ “Drawing on the Right Side of the Brain Workbook.” It is a great resource for both artists and art educators.Though Betty Edwards is credited in a general way, this is copyright material and should be marked as such.
Thank you Glenda for pointing that out – I was just about to … ‘not realizing’ something is copyrighted is not a valid reason in the courts, so it’s not a valid reason for this type of posting either. It’s up to the person who posts – or passes on the post on behalf of someone else – ie: a guest post – to check and make sure the material is original in content. Just sayin’ …
Thank you for your input Sharon (and Glenda too). I always check my guest posts within Google to make sure the content is original – as I did this with this post. What I didn’t ‘realize’ was that this post was predominately inspired by Betty Edwards’ book. After Glenda’s comment, only one mention of the book didn’t seem enough, so I added the extra link back to her site. I certainly want to give proper credit.
That said, it is quite common to take content from a book or magazine and rewrite (in one’s own words) it into a blog post. I have done this myself in a popular post https://www.finearttips.com/2009/10/water-soluble-oil-paints-facts-tips-why-i-use-them/ which was inspired by Sean Dye’s book on water soluble oils. I took much of his technical information and shared it in my own words! The publishers (F&W Media/NorthLight Books) of the book have been very happy with the free publicity – and in fact, I am writing a book based on my blog for them right now.
Betty’s book was originally sited in this post, but after Glenda’s comment I felt I should make it more clear and added Betty’s website at the beginning of the post.
My original reply was due to the fact that Glenda didn’t feel as though I had properly given credit to Betty Edwards for inspiring this content. ‘Outtakes’ would suggest a direct copy – this guest post is not. I do my best to be ethical, and helpful to my fellow artists. Therefore I do appreciate Glenda’s reaction, so I added an extra note at the beginning of the post to clear up any misinformation.
I have done all but two of these in my 8th grade drawing unit– adding the first and the last to my list.
Great Linda! I hope your kids enjoy them…
great and wonderful idea. would like try out these tips. expecting more and more tips like this….!
Great, let me know how your drawing improves. Thanks!
When i draw protraits when it completes it get some extra line here and there so how to Less this any practice .
I’m not sure I understand your question….please explain again. Thanks!